Transferring Solana takes under a minute once you know the process. The Solana network confirms transactions in one to two seconds and charges less than $0.001 per transfer. The steps are the same whether you are moving SOL between two personal wallets, sending Solana from an exchange to Phantom, or depositing from Phantom to Coinbase. What changes is where you copy the address from and where you paste it. This guide covers every combination, the fees involved, how to track a transfer, and what to do if something does not arrive.
How to transfer Solana in three steps
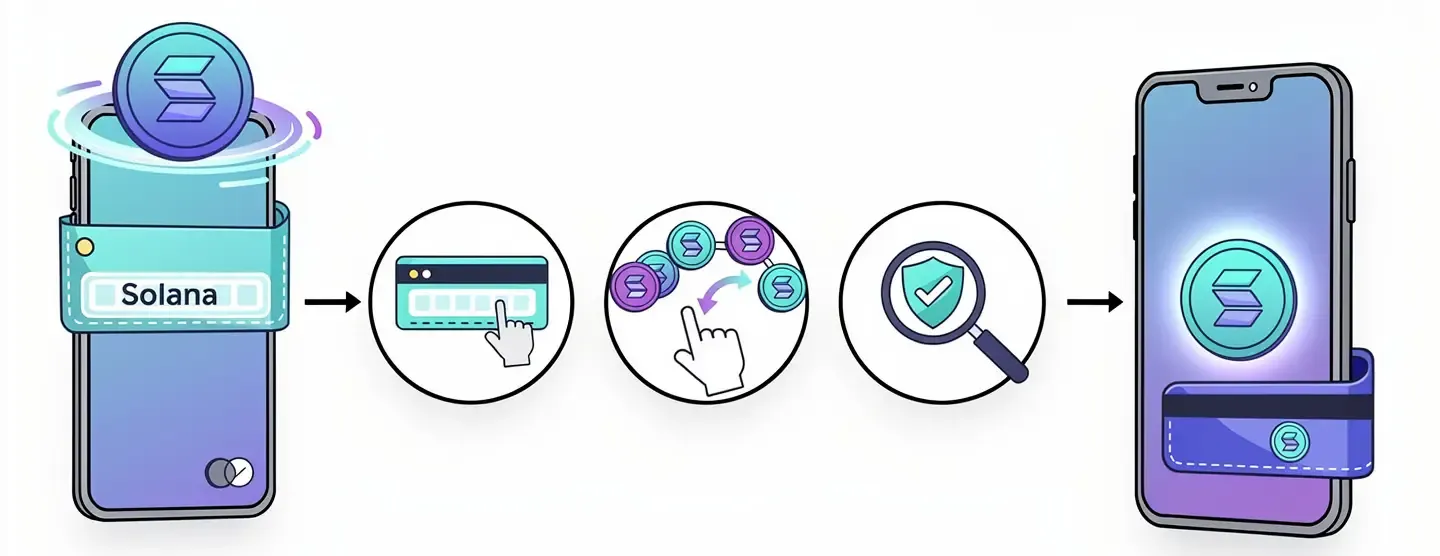
Every SOL transfer follows the same pattern regardless of the wallets or exchanges involved. Whether you are sending Solana to a friend, moving funds to a DeFi wallet, or depositing to an exchange, the three steps below apply.
- Get the receiving address. Open the destination wallet or exchange. Click “Receive” or navigate to the deposit section. Copy the Solana address exactly – do not type it manually.
- Initiate the send. Open the source wallet or exchange. Click “Send” or “Withdraw.” Paste the address you copied. Select Solana as the network. Enter the amount.
- Confirm and verify. Review the address and amount, then confirm the transaction. Open Solscan or Solana Explorer, paste the transaction ID, and verify the transfer arrived.
The sections below cover each scenario in detail: wallet to wallet, exchange to wallet, wallet to exchange, and exchange to exchange.
Before you send: what you need to know about Solana addresses
The single most important thing to understand before sending any SOL is the address format and network selection. Most lost funds happen because of errors at this stage, not during the transaction itself.
What a Solana address looks like
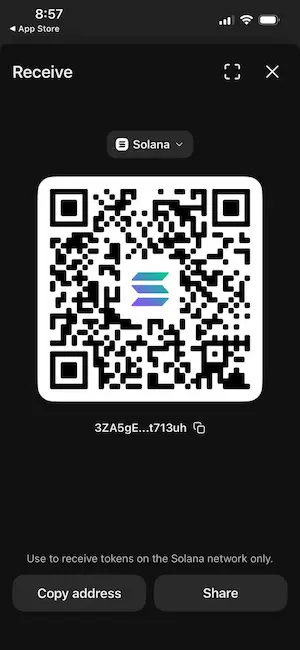
A Solana address is a string of 32 to 44 base58 characters. It looks like this: 3ZA5gEJAHhABX2WSb3kHWbZGddbqjs1QkGKxfgt713uh. Every wallet has a unique address. You can share your address openly – sharing it does not give anyone access to your funds, only the ability to send to it.
Solana addresses look visually similar to Ethereum addresses but they are not compatible. An Ethereum address starts with “0x” and is 42 characters long. A Solana address has no “0x” prefix and is longer. Never send SOL to an Ethereum address and never send ETH to a Solana address – funds sent to the wrong address type are unrecoverable.
Phantom wallet is a multichain wallet that supports Solana, Ethereum, Base and Bitcoin. When you click “Receive” in Phantom, it shows you multiple addresses for different networks. You must copy the Solana address, not the Ethereum address. The two look different (no 0x prefix on Solana) but it is easy to click the wrong one. Always check the network label next to the address before copying.
Why you must select the Solana network every time
When withdrawing from an exchange like Coinbase, Binance or Kraken, the withdrawal form shows a network selection field. For SOL, the correct network is always Solana (also called Solana Mainnet or SOL). Many exchanges also list Ethereum, BNB Chain or other networks for SOL or wrapped SOL versions.
If you select the wrong network, the transfer goes to an incompatible address. The exchange processes it, the SOL leaves your account, and it does not arrive in your wallet. In most cases this is irreversible. The exchange cannot reverse it and the receiving wallet cannot recover funds sent on a different network. This is the most common cause of lost funds in Solana transfers. Always read the network label before confirming a withdrawal.
Always send a test transaction first
Before moving a significant amount, send a test transaction of 0.01 SOL. Wait for it to arrive, verify it in your receiving wallet and on Solscan, and only then send the full amount. The test costs less than a cent in fees and confirms the address is correct, the network is right, and the receiving wallet is working. This step takes two minutes and removes the risk from every subsequent transfer. For a full explanation of why Solana fees stay so low, the Solana transaction fees guide covers how the fee structure works and what determines the cost of each transaction.
How to send SOL from Phantom to another wallet
This covers sending SOL from one Phantom wallet to a second Phantom wallet, or from Phantom to any other Solana-compatible wallet like Solflare or Backpack.
Step 1: copy the receiving address from the destination wallet
Open the wallet that will receive the SOL. In Phantom, hover over the account name at the top to see the address, or click “Receive” and select Solana from the token list. Click “Copy” to copy the address to your clipboard.
Open a plain text application like Notepad and paste the address there. This gives you a visual reference to compare against what you paste into the send form. Phantom shows the first and last few characters of the address in the confirmation screen – verify these characters match your Notepad copy before confirming.
Step 2: open the sending wallet and click Send
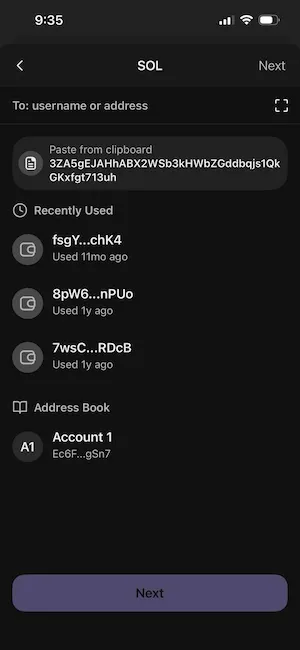
Open the Phantom wallet that holds the SOL you want to transfer. Click on the SOL balance in your portfolio. Click “Send.” In the “Recipient’s Solana address” field, paste the address you copied in Step 1. Verify the first and last few characters match your Notepad reference.
Do not type the address manually. Copy and paste only. One wrong character sends the SOL to a different address that almost certainly belongs to no one, and the funds cannot be recovered.
Step 3: enter the amount and confirm
Enter the amount of SOL you want to send. Phantom displays the estimated network fee – typically $0.00025 or less. The fee is deducted from your SOL balance, not from the amount you are sending, so the recipient receives exactly what you entered.
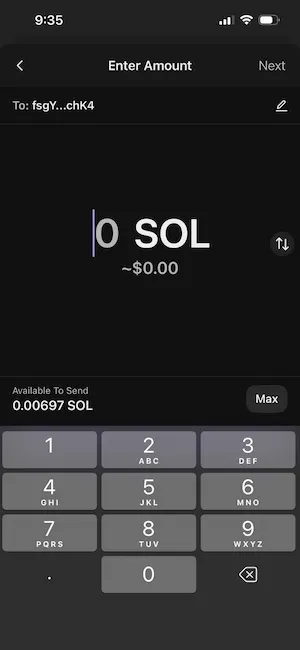
Click “Next.” Review the confirmation screen: verify the recipient address, the amount, and the network shown as Solana. Click “Send.” The transaction broadcasts to the Solana network immediately.
Step 4: verify the transfer on Solscan
After sending, Phantom shows a “Sent” confirmation. Click “View transaction” to open Solscan directly. On Solscan you can see the transaction status (Finalized = success), the sending address, the receiving address, the amount, and the fee. A green “Success” label and “Finalized” status mean the SOL has arrived. The whole process from send to finalized typically takes one to two seconds.
If you prefer, paste the transaction signature into Solscan.io or explorer.solana.com to check status manually. For background on how the Solana network achieves this confirmation speed, the guide on how Solana works covers Proof of History and the validator process that makes one-second finality possible.
How to transfer Solana from a centralized exchange to Phantom
This is the most common transfer scenario for new users: you bought SOL on Coinbase, Kraken or Binance and want to move it to a self-custody wallet. The process is the same across all three exchanges with minor interface differences.
Step 1: get your Phantom deposit address
Open Phantom wallet. Click “Receive.” Select Solana (SOL) from the token list. Copy the address shown. This is your personal Solana deposit address.
If you are using Phantom on mobile, the “Receive” button is at the bottom of the main screen. Tap it, select SOL, and either copy the address or use the QR code. The QR code is useful if your exchange’s mobile app supports scanning – it eliminates the paste step and reduces address error risk.
Step 2: find the withdrawal section on your exchange
On Coinbase: click the “Send” or “Send/Receive” button. Select SOL as the asset. The form asks for the recipient address.
On Binance: go to “Wallet” then “Spot Wallet.” Find SOL and click “Withdraw.” The form asks for the wallet address and network.
On Kraken: go to “Funding” then “Withdraw.” Search for SOL and click “Withdraw.” Add your Phantom address as a withdrawal address (Kraken requires saving addresses before using them).
Step 3: paste the address, select Solana network and confirm
Paste your Phantom SOL address into the withdrawal address field. On exchanges that show a network selection, confirm the network shows Solana or SOL Mainnet. Enter the amount. Review the withdrawal fee – most major exchanges charge 0.01 SOL for SOL withdrawals.
Confirm the transaction. Most exchanges require a 2FA code (from your authenticator app or via email) to approve withdrawals. Enter the code and submit. The exchange processes the withdrawal and broadcasts the transaction to the Solana network.
How long does it take and what fees apply?
Once the exchange broadcasts the transaction, Solana confirms it in one to two seconds. The total time from clicking confirm to seeing SOL in your Phantom wallet is typically one to three minutes, including the exchange processing time. During periods of high exchange withdrawal volume, exchange processing can take up to 30 minutes, but the Solana network itself is not the bottleneck.
| Exchange | SOL withdrawal fee | Minimum withdrawal | Network |
|---|---|---|---|
| Coinbase | 0.01 SOL | 0.02 SOL | Solana |
| Binance | 0.01 SOL | 0.02 SOL | SOL (Solana) |
| Kraken | 0.01 SOL | 0.02 SOL | Solana |
| Phantom (wallet to wallet) | ~$0.00025 network fee only | No minimum | Solana |
The 0.01 SOL exchange withdrawal fee covers the exchange’s operational cost, not the Solana network fee, which is a fraction of a cent regardless. At $90 per SOL, 0.01 SOL withdrawal fee is approximately $0.90.
How to send SOL from Phantom to an exchange
Sending SOL from Phantom to an exchange is the reverse of the previous process. This is how you move SOL to sell it or use it on the exchange.
Log in to your exchange account. Navigate to the deposit section and select Solana (SOL). The exchange displays your unique deposit address for SOL. Copy it exactly. Some exchanges also show a QR code you can scan.
Open Phantom wallet. Click “Send.” Paste the exchange deposit address into the recipient field. Before entering the amount, verify the first and last four characters of the pasted address match the exchange deposit address you copied. Enter the amount and confirm. Sending Solana from a self-custody wallet to an exchange is the standard first step before selling.
One important note: some exchanges, particularly older versions of Binance and certain international exchanges, require a memo or tag field alongside the deposit address. Check whether your exchange’s SOL deposit page shows a memo field. If it does, copy both the address and the memo and include both in your Phantom send. Phantom has a “Memo” field in the send interface for this purpose. Sending to an exchange that requires a memo, without the memo, can result in delayed or uncredited deposits – contact exchange support with the transaction ID in that case.
How to transfer SOL between two exchanges
If you hold SOL on one exchange and want to move it to another – for example from Coinbase to Binance for a lower trading fee – the process follows the same pattern. This is a common way to transfer Solana when you want access to a specific trading pair or lower spot fees on a different platform. Knowing how to send Solana between exchanges also lets you move funds to wherever you get the best price before selling.

On the receiving exchange, go to the deposit section for SOL and copy the Solana deposit address. On the sending exchange, go to the withdrawal section, paste that address, select the Solana network, enter the amount and confirm with 2FA.
The key check: confirm both exchanges support SOL on the Solana network. Most major exchanges do. The only risk is selecting the wrong network on withdrawal – Coinbase defaults to the Solana network for SOL, Binance sometimes lists multiple SOL networks including bridged versions. Select the one labeled Solana or SOL Mainnet.
How to transfer SPL tokens (USDC, BONK and others) on Solana
SPL tokens are all the tokens built on the Solana network beyond SOL itself. USDC on Solana, BONK, JUP, and hundreds of others are SPL tokens. Sending Solana network tokens works the same way as sending SOL in Phantom, with one important difference you need to know before your first SPL transfer.
To hold any SPL token, a wallet must have an Associated Token Account (ATA) for that specific token. Think of it as a sub-account dedicated to that one token type. Phantom and most modern Solana wallets create ATAs automatically when you receive a new token. Creating an ATA costs approximately 0.002 SOL in rent, which is deducted from the sender’s wallet on the first transfer to a new address.
This means: if you send USDC to a wallet address that has never held USDC before, the transaction costs slightly more than usual (around 0.002 SOL extra) to create the ATA. Phantom shows this in the fee estimate before you confirm. If the destination wallet already holds that token, no ATA creation is needed and the fee is the standard $0.00025.
You always need SOL in your wallet to send any SPL token, even if you are sending Solana network tokens like USDC or BONK. SOL pays the network fee. If your wallet holds USDC but zero SOL, no transfer can go through. Keep at least 0.01 SOL in any active wallet as a fee reserve. For a full breakdown of what SOL is used for on the network, the SOL token overview covers fees, staking and the token’s role in the network.
Solana transfer fees explained
Solana fees are split into two types: the network fee paid to validators, and the exchange withdrawal fee paid to the platform.
The Solana network fee for a standard SOL transfer is approximately 5,000 lamports. One SOL equals one billion lamports. At $90 per SOL, 5,000 lamports is $0.00045. This fee does not change based on the amount you transfer – sending $10 of SOL costs the same as sending $10,000 of SOL. The fee goes to the validators who process and confirm the transaction.
The exchange withdrawal fee (0.01 SOL at most major exchanges) is separate and set by the exchange, not the network. It is charged on top of the network fee when you initiate a withdrawal. Wallet-to-wallet transfers between two Phantom wallets, for example, incur only the network fee with no exchange withdrawal fee.
Priority fees can optionally be added to move a transaction to the front of the processing queue during periods of high network activity. For standard SOL transfers between wallets, priority fees are not necessary – the base fee is almost always sufficient. The Solana fee model uses compute units to meter every instruction, with the base fee set at 5,000 lamports per signature.
How to track a Solana transfer
Every Solana transaction has a unique transaction ID (also called a transaction signature or TXID). It is a long alphanumeric string like 5UEwqtGXNPDMSF7YPGJNrBMHLNbqoXu7RtZRFrPjYFuK3... You can use this ID to track the transfer on any Solana block explorer.
The two main explorers are Solscan (solscan.io) and Solana Explorer (explorer.solana.com). Paste the transaction ID into the search bar of either. The explorer shows:
- Status: Success / Failed / Pending
- Block: which block the transaction was included in
- From: the sending address
- To: the receiving address
- Amount: SOL or token transferred
- Fee: network fee paid
- Timestamp: when the transaction was finalized
If Phantom shows “Sent” but the SOL has not appeared in the receiving wallet, paste the transaction ID into Solscan immediately. If the status shows “Success” and “Finalized,” the SOL has left the sending wallet and arrived at the receiving address. If it is not visible in the receiving wallet, try refreshing the wallet or logging out and back in.
If you sent from an exchange and do not have a TXID yet, go to the exchange withdrawal history section. It shows the transaction status (Pending / Processing / Completed) and provides the TXID once the exchange has broadcast the transaction.
What to do if your Solana transfer is not showing up
Most transfer issues fall into one of four categories. Work through them in order before contacting support.
Check Solscan first
Go to solscan.io and search for your transaction ID. If the status shows “Success” and “Finalized,” the transfer completed on-chain. The issue is with wallet display, not the transfer itself. Try refreshing your receiving wallet. In Phantom, pull down on the main screen to force a balance refresh. Log out and back in if that does not work.
If the transaction does not appear on Solscan at all, the exchange may not have broadcast it yet. Check the withdrawal history on your exchange. “Pending” or “Processing” means the exchange is still handling it internally. “Completed” with a TXID means it is on-chain and Solscan will show it.
Common reasons a transfer is delayed or missing
- Exchange processing queue: during high-volume periods exchanges batch withdrawals. A “Pending” status in withdrawal history is normal for up to 30 minutes.
- Wrong network selected: if you selected Ethereum or BNB Chain instead of Solana, the SOL went to an incompatible address. Check the transaction on the Ethereum or BSC block explorer using the TXID to confirm this.
- Missing memo: if the receiving exchange required a memo and you did not include one, the deposit may be received but not credited to your account. Contact the exchange with the TXID and explain the situation – exchanges can often manually credit memo-less deposits within a few days.
- Receiving wallet not refreshed: some wallet apps do not auto-refresh. Pull down to refresh or reopen the app.
What to do if you sent SOL to the wrong address
If you sent SOL to the wrong Solana address, check Solscan first. If the transaction shows “Finalized,” the SOL has left your wallet and arrived at that address. On Solana, transactions are irreversible once finalized – there is no undo and no recovery mechanism built into the protocol.
If you sent to an address you typed incorrectly, the SOL is almost certainly lost permanently. No one controls a random mistyped address.
If you sent to an exchange address that is not yours, contact the exchange support team with the transaction ID and your account details. Some exchanges can identify and return funds sent to the wrong user account, though this is not guaranteed and takes time.
If you sent on the wrong network (for example, sent using the BNB Chain network to a Binance SOL deposit address), contact Binance or whichever exchange was involved. They may be able to recover cross-network deposits in some cases, though this is not always possible and often takes weeks.
This is why the test transaction matters. One 0.01 SOL test before every new transfer confirms the address works before the full amount is sent. For a broader picture of how Solana addresses and accounts work at the protocol level, the Solana programs and accounts guide explains the account model that underpins every wallet address on the network.
Frequently asked questions
How long does a Solana transfer take?
Solana confirms transactions in one to two seconds on the network level. The total time you wait depends on the source: wallet-to-wallet transfers show up in two to five seconds. Exchange-to-wallet transfers take one to five minutes including exchange processing time. During peak exchange withdrawal periods, exchange processing can add up to 30 minutes, but the network itself is never the bottleneck.
What is the fee to transfer Solana?
Wallet-to-wallet transfers (Phantom to Phantom, Phantom to Solflare, etc.) cost approximately $0.00025 in Solana network fees. Exchange withdrawals add a platform fee on top – most major exchanges charge 0.01 SOL (roughly $0.90 at $90 per SOL). There is no exchange fee for wallet-to-wallet transfers.
Can I send SOL to an Ethereum address?
No. SOL sent to an Ethereum address on the Solana network goes to an address that almost certainly belongs to no one and is unrecoverable. Solana addresses (32-44 base58 characters, no 0x prefix) and Ethereum addresses (42 characters, starts with 0x) are not compatible. Always confirm you are pasting a Solana address when sending SOL.
How do I find my Solana address in Phantom?
Open Phantom and click “Receive” at the bottom of the main screen. Select Solana (SOL) from the token list. Your Solana address appears along with a QR code. Click “Copy” to copy it to your clipboard. If Phantom shows multiple addresses (for Ethereum, Base, etc.), make sure you select the Solana one – it does not start with 0x.
What is the minimum amount of SOL I can transfer?
For wallet-to-wallet transfers, there is no enforced minimum beyond the network fee. You can send 0.001 SOL if you want. Exchanges set their own minimums for withdrawals – most require at least 0.02 SOL. The receiving wallet must also maintain a small SOL balance (about 0.00089 SOL) to keep the account open, known as rent-exempt minimum.
Can I transfer USDC on Solana the same way I transfer SOL?
Yes, the process is identical in Phantom. Select USDC from your token list, click Send, paste the recipient address, enter the amount and confirm. The difference is that you always need SOL in your wallet to pay the network fee, even when transferring USDC. Also, if the recipient wallet has never held USDC before, creating the Associated Token Account adds approximately 0.002 SOL to the fee – Phantom shows this before you confirm.
What happens if I select the wrong network when withdrawing from an exchange?
If you select Ethereum instead of Solana when withdrawing SOL from an exchange, the transaction is processed on the wrong blockchain. The funds almost always become unrecoverable from a standard wallet. Contact the exchange support immediately with the transaction ID. Some exchanges can recover cross-network deposits, but this is not guaranteed and can take weeks. This is why you verify the network label before every withdrawal.
How do I track a Solana transfer?
Get the transaction ID from Phantom’s activity history or from the exchange withdrawal history. Go to solscan.io and paste the transaction ID into the search bar. The result shows the status (Success or Failed), sending and receiving addresses, amount transferred, fee paid, and confirmation timestamp. A “Success” with “Finalized” status means the transfer completed and the SOL arrived at the destination address.
Do I need a memo when sending SOL to an exchange?
Most modern exchanges do not require a memo for SOL deposits. However, some exchanges, particularly older platforms or certain regional exchanges, do require a memo alongside the deposit address. Always check the exchange’s SOL deposit page for a memo field. If one appears, copy both the address and the memo and include both when sending. Sending without a required memo can delay or prevent your deposit from being credited.
Can I send SOL from Phantom to MetaMask?
MetaMask does not natively support the Solana network. Sending SOL from Phantom directly to a MetaMask address sends it to an address that MetaMask cannot display or access. The funds would be on the Solana blockchain at that address, but MetaMask has no way to show or use them. If you need SOL in MetaMask, you would need a bridge to convert it to an ERC-20 wrapped version, which is a different process entirely. For most purposes, Phantom or Solflare are the correct wallets for holding native SOL.
What is the difference between a Solana transfer and a bridge?
A Solana transfer moves SOL or SPL tokens between two addresses on the Solana blockchain. Both the sender and receiver are on Solana. A bridge moves tokens from one blockchain to another – for example, converting native SOL on Solana into Wrapped SOL (wSOL) on Ethereum. Bridges are slower, more expensive, and involve more steps than a standard transfer. If you are sending SOL between wallets or between a wallet and an exchange, you are doing a transfer, not a bridge.
What should I do with SOL once it arrives in my wallet?
Holding SOL in a self-custody wallet like Phantom means you can stake it to earn rewards of approximately 5% to 8% APY, use it to pay transaction fees on Solana applications, trade it for other tokens on Jupiter, or keep it as a long-term holding. Once you have completed a how to transfer Solana process successfully and your SOL is in Phantom, you have full control over your assets and can use the entire Solana network. Sending Solana to a self-custody wallet is the first step toward using DeFi, staking, and NFT platforms. For a full picture of what the Solana network does and why people hold SOL, the Solana overview covers the network, its use cases and what drives demand for SOL.